Tag Archives: Can’t Stop Grillin’

Spatchcock BBQ Chicken

SPATCHCOCK! No, that’s not a dirty word or an insult or anything along those lines, this isn’t that type of blog.  Spatchcock is simply the term used to describe a chicken, turkey, or any other type of whole bird that has been split along the spine (removing the spine) to allow it to open up and lie flat.

20141025_111557

I love whole chickens. Whole chickens give you the ability to prepare both white and dark meat at the same time while the bone and skin give the meat a huge boost in flavour.

The idea behind spatchcocking a chicken is it allows you to cook the chicken fully on the bone as you would with a whole chicken but much faster. The body cavity (where we usually jam stuffing) insulates the bird during cooking.  This insulation slows down the cooking process and also makes the bird cook unevenly.  Spatchcocking removes this cavity.   Birds are weirdly shaped with big pieces of meat intertwined with much smaller pieces.  This process helps the breast and dark meat sections to cook at relatively the same pace.

To start, you are going to need a whole chicken, a very sharp knife or kitchen scissors and a cutting board.  Safety tip; use sharp knives!  People are afraid of sharp knives as they think they are going to lop off a finger or an entire appendage.  If you are careful, a sharp knife is actually safer than a dull knife.  Dull knives force you to push harder than needed, which increases the chance of the knife slipping and cutting you.  If your cutting board has a tendency to slide around while cutting with it try putting a slightly damp kitchen towel underneath it.  This should stop the sliding.

20141025_111535

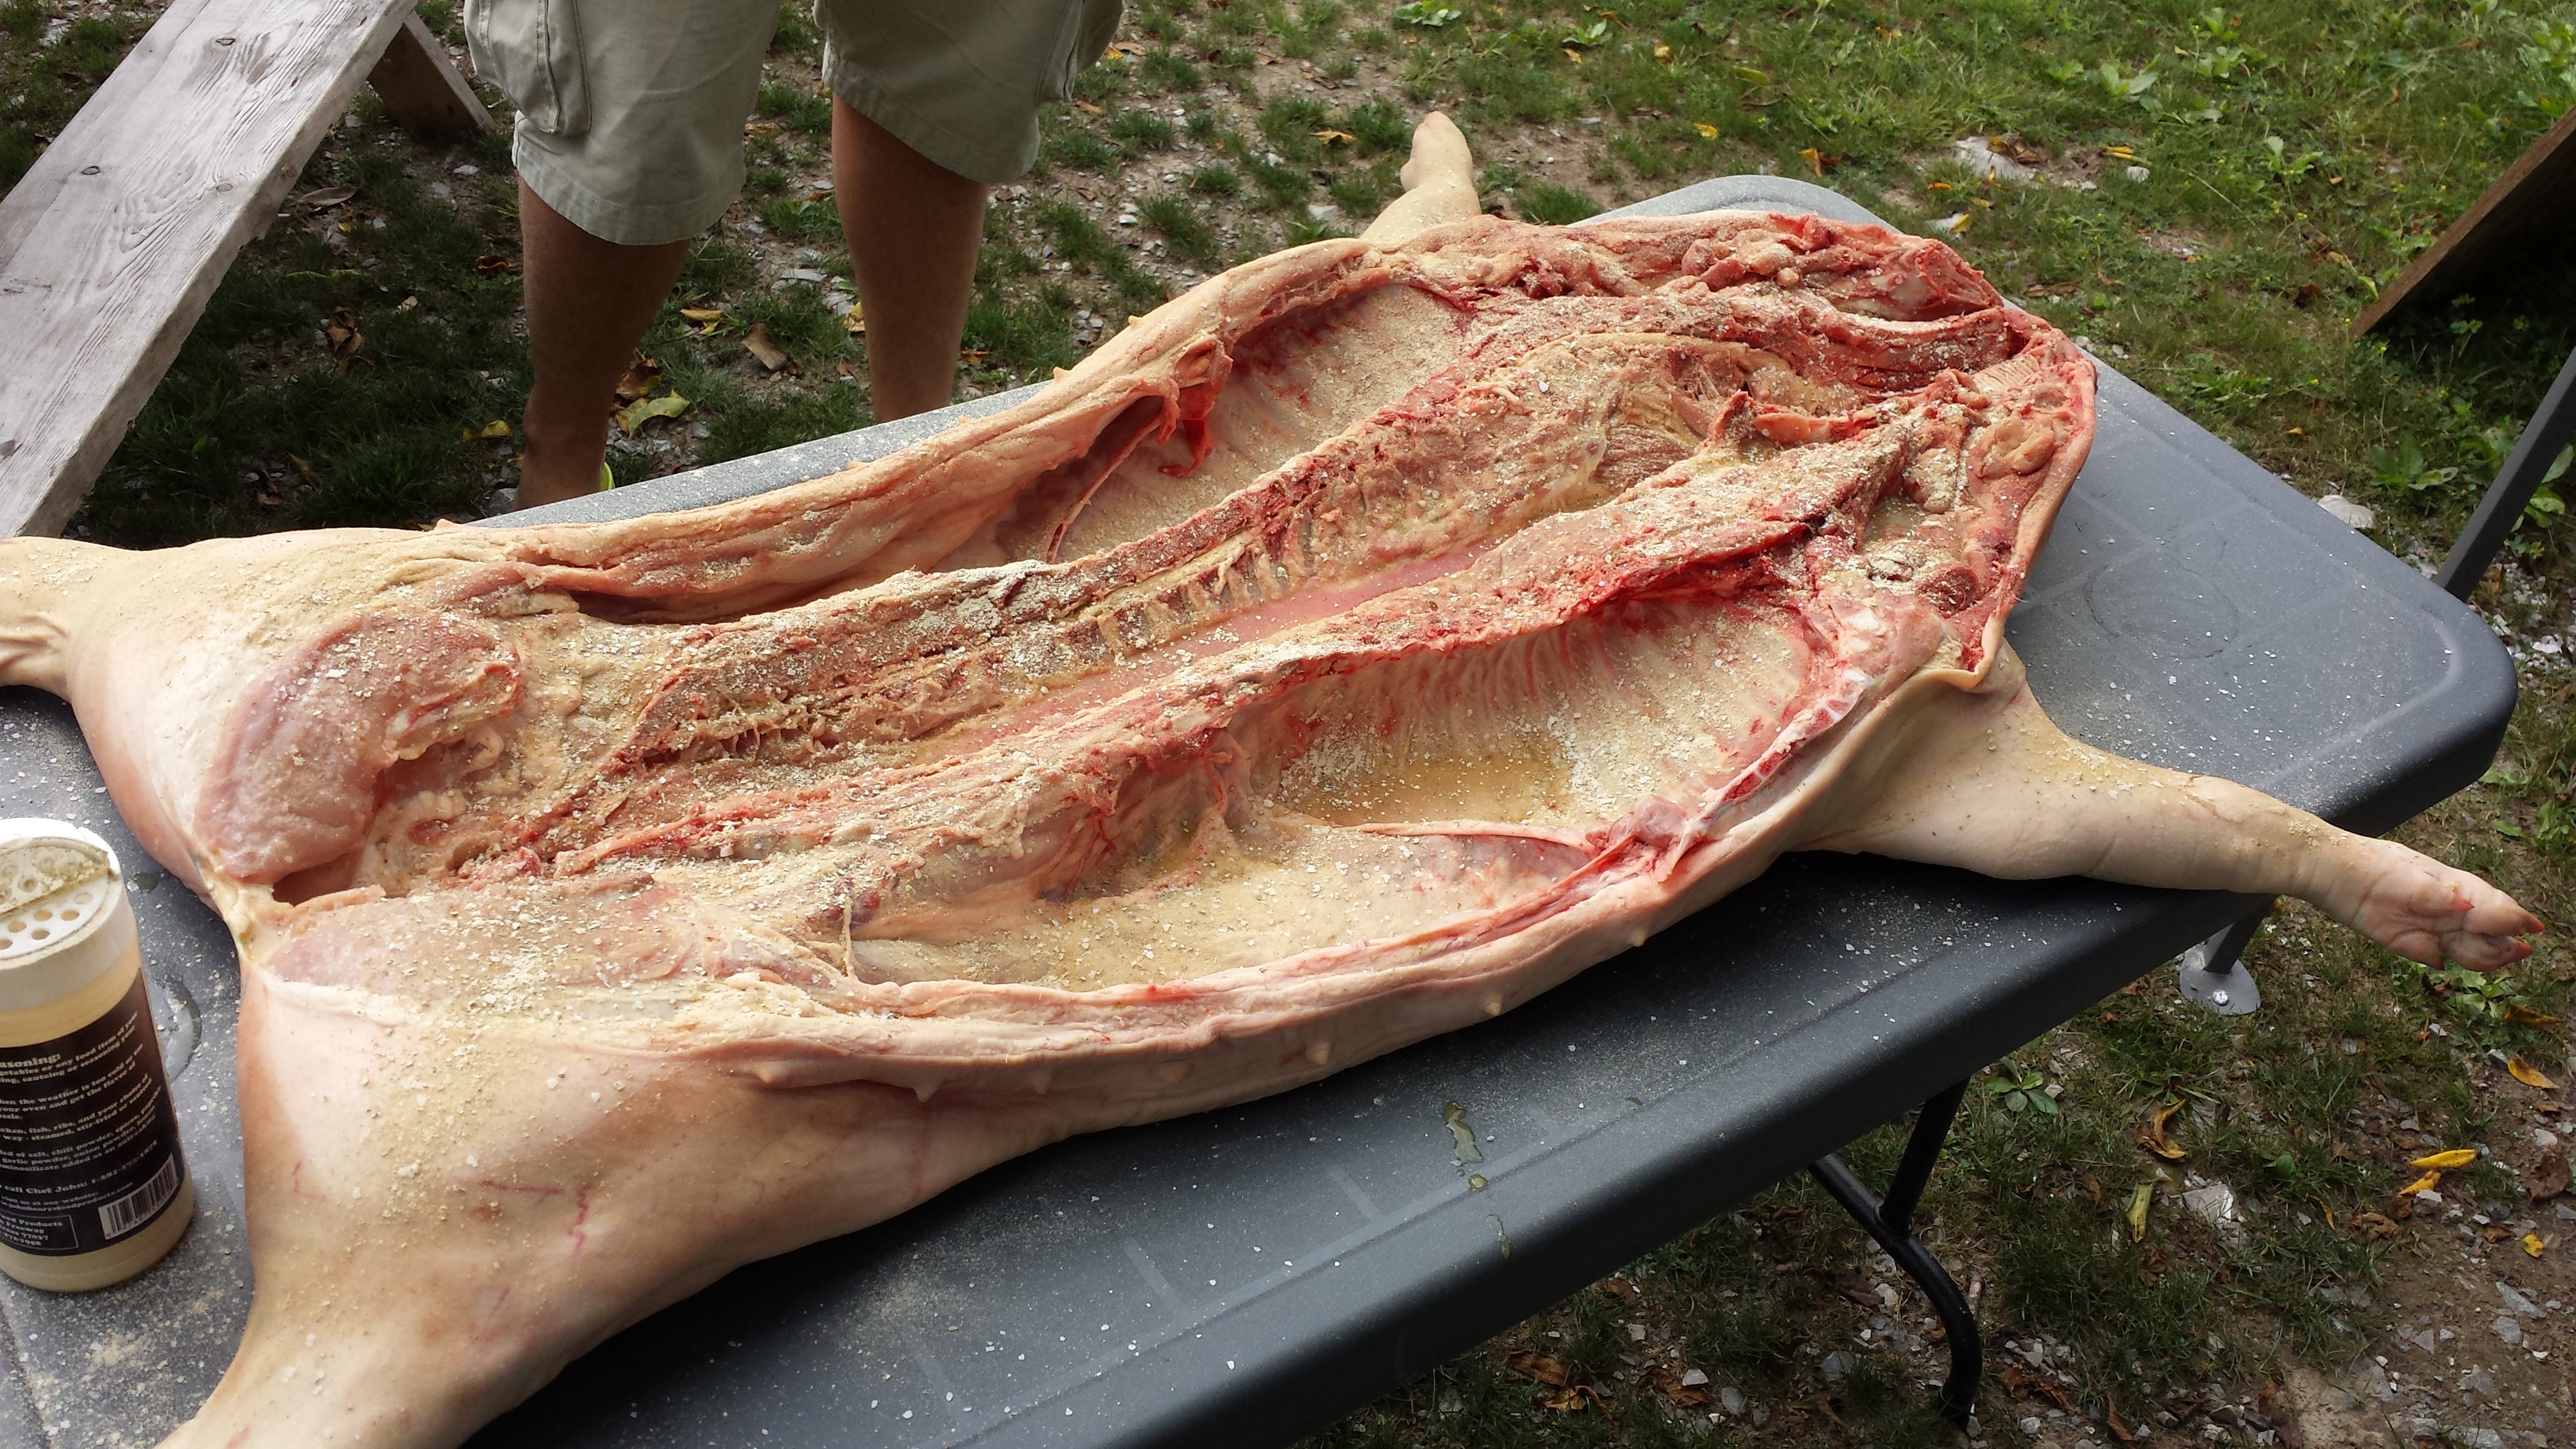
Place the bird so the spine is resting on your cutting board.  Either with your knife or your scissors cut up either side of the spine and remove. **Please note that the chicken in the picture above is actually the wrong way up.  Please do not attempt to cut it in this manner unless you are using scissors.**

20141025_111548

Note: in the above picture the spine is still attached on the left side.

20141025_111557

Now that the spine is gone take both hands and push down firmly on both breasts at the same time.  You will probably feel and hear some snapping as this will break some of the rib bones and allow the chicken to lay as flat as possible.

Season the chicken liberally on both sides with your favourite BBQ Seasoning.  I like to do this the day before I cook the bird or at least a few hours ahead.  This allows the spice blend to really penetrate the meat.

20141025_112529

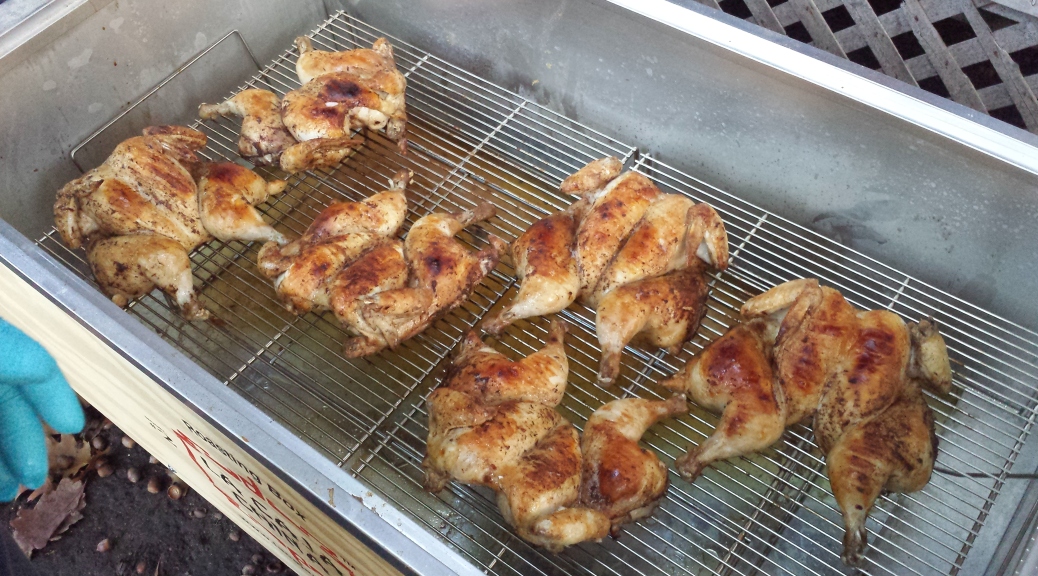
To cook, preheat one side of your BBQ to medium heat but leave the other side off. If using charcoal, have one side of the grill with a bed of coals that have fully lit and are fully grey, then wait 10 minutes, no charcoal at all on the other side.  Cook skin side up for 10 minutes with the lid closed.  Flip and then cook for another 10 minutes skin side down with the lid closed.  Now, place the chicken on the cold side of the BBQ and cook for another approximately 20 minutes with the lid closed or until the breast meat is at 165 degrees.

20141025_180140

Enjoy!

Spatchcock BBQ Chicken

  • Servings: 4-6
  • Difficulty: Easy
  • Print

Ingredients

  • 1 whole chicken
  • BBQ Spice
  • Kitchen Scissors or a sharp knife

Directions

  • Use kitchen scissors or knife to remove the spine by cutting up either side.
  • Place both hands on the breasts and push down flattening the bird.
  • Season liberally on both sides with BBQ Spice
  • Place in a ziplock bag and allow to sit for up to 24 hours
  • Preheat one side of your grill to medium heat and leave the other side off
  • Place the chicken skin side up directly over the heat and cook for 5-10 minutes with the lid closed.
  • Turn chicken over and cook skin side down for another 5-10 minutes with the lid closed.
  • Move chicken to the indirect side of grill and cook for another approximately 20 minutes with the lid closed or until the chicken is 165 degrees in the breast meat.
  • Cut chicken into individual pieces (breast, thigh, drum, wing) and serve.


Whole Hog

Whole Hog…The mother of all BBQ feats. The task that makes even the most confident backyard warrior think twice.  I decided it was time. I decided I was ready.  The results were better than I hoped for.

20140913_171501First, let me start by thanking some people.  These people were a big help with the cooking of this pig.  They helped me wrangle the pig, get the pig in the racks, move the grates and pans around, pull the pig apart once it was cooked and of course, taste test it once it was done.  A big thanks to Casey, Joel, Uncle Mark, Chad, Shane, Matt, Amy, Jill, Sarah, Carissa and everyone that was on hand to help put the rest of the shindig together.

As I posted earlier on this blog I was aiming to get my hands on a La Caja China Roasting Box…well, I got one.

20140913_161957I went with Model #2.  It is the bigger box and can handle larger pigs.  Go big or go home, right?

I ordered the pig from Kohns in London.  I asked for a 50lb pig, dressed weight, butterflied open.  “Dressed Weight” simply means all the guts and nasty bits are removed and you have a clean carcass.  “Butterflied” means they split the backbone for me so that the pig will lay flat.  When I arrived to pick up the pig it was 52lbs and they split it perfectly for me while I was there.  I highly recommend you become friends with your butcher.  I highly recommend Kohns.  Always great service and quality.

My buddy Casey was with me when we picked it up.  We put it in a big cooler with some blocks of ice to keep it cool.

20140912_143229The day before I had prepared the injection I was planning to use and the dry rub for the pig.  Because this was my first attempt and because of the hours and hours of videos I watched on Youtube regarding cooking a pig I decided to stick to a tried and true approach.  I used the injection and rub suggested by La Caja China, the makers of the box.  It is a traditional Cuban Mojo Criollo Injection and an Adobo Seasoning mix.  Both credited to Roberto Guerra of La Caja China.  I didn’t change a thing.

Mojo Criollo

Ingredients

  • 3 heads garlic, peeled
  • 1 teaspoon whole black peppercorns
  • 2 teaspoons coarse salt
  • 1 1/2 cups freshly squeezed sour orange juice (or 1 cup freshly squeezed orange juice mixed with 1/2 cup freshly squeezed lemon juice)
  • 1/2 cup pineapple juice
  • 2 teaspoons oregano
  • 1 teaspoon ground cumin
  • 1 teaspoon ground bay leaves

Directions

  1. Place garlic, peppercorns, and salt in a large mortar and grind with a pestle to form a paste. Stir in sour orange and pineapple juice. Add oregano, cumin, and bay leaves; stir to combine. Let stand at least 1 hour before using.

20140911_210714

Adobo Seasoning

Ingredients

  • 1/2 cup coarse salt
  • 1/2 cup garlic powder
  • 1/4 cup onion powder
  • 1/4 cup ground oregano
  • 4 teaspoons ground bay leaves
  • 1 tablespoon ground cumin
  • 1/2 teaspoon freshly ground black pepper

Directions

  1. Mix together all ingredients in an airtight container; cover and let stand at least 12 hours before using.

20140911_212108

The day before we planned to cook the pig I injected the pig all over but focused on the hams (back legs), shoulders (front legs), loin (attached to the ribs) and the belly meat (the..well…belly of course).

It’s worth noting that I strained the injection before I used it so any large chunks wouldn’t plug up the needle on the injector.

After injecting the pig I coated both the skin side and the open side with the seasoning blend.

20140912_150024 20140912_150028

It was back into the cooler at this point for the night for the injection and spice blend to do their work.

The next morning the pig was brought out about an hour before we planned to cook it to come to room temperature as suggested in the cooking instructions for the pig.  Notice in the picture below the difference in colour of the meat.  The seasoning and injection did it’s job.

20140913_114306

The pig was then put into the racks that came with the roasting box and closed using the “S” hooks provided.  Here is a tip for you; this is not a 1 person job.  It took 3 of us to get the hooks in place.  Two people pressing down on the side of the rack and one person placing the hooks.

Once we FINALLY had the pig in the racks it was time to enter the roasting box.

20140913_124503

You will notice there are some wires coming out of the pig.  We attached a couple meat probes in the pig to monitor the progress as it cooked.  Next time I won’t bother.  If anything, all the probes did was add stress where none was needed.  The directions they give you right on the side of the box are all you need.  I followed them exactly and am glad I did.

We used the instructions for a 51 to 100lbs. pig.  We did this because you will notice that the pig weights on the box are based on “Live Weight” not “dressed”.  Live weight is the total weight of the pig before any cleaning or butchery is done.  Because our pig was 52lbs dressed, it was easily 60-70lbs live weight.

Once the pig is in the box, place the top charcoal grate and ash pan to seal the box.  We started with the recommended 18lbs of charcoal, placed in two piles to light.  Here is the hardest part of the cook.  You can NOT lift that lid.  For no reason.  Not even for a second for a quick peak.  JUST DON’T DO IT!

20140913_125414

We doused in lighter fluid and let them burn until almost all of the coals were turning grey, meaning they were on fire and burning.  This took about 20 minutes.  I then spread the coals out evenly over the top of the box and began my timer.

20140913_131115

The instruction on the side of the box calls for adding fresh charcoal every hour.  Based on the weight of our pig I added 10lbs of charcoal after 1 hour and then another 10lbs after the second hour.

20140913_151546

You do not need to worry about starting the charcoal in a chimney or anything like that.  The already lit coals will ignite the fresh coals.  Make sure you follow the amounts on the side of the box and spread it out evenly when you add it.

The next step was to add 12 lbs of charcoal 30 minutes after the second 10lbs of charcoal was added.

20140913_161957

30 minutes after the 12lbs were added it is time to finally see what the pig looks like.  The instructions call for you to remove the ash from the ash collection pan.  This will remove all the ash which is actually reducing the amount of heat the pig could receive.  By removing this ash we will get a very high temperature in the box which we need at this point.  We will be turning the pig over to crisp the skin.  High heat is definitely needed for this.

Lift the charcoal grate and shake to remove the ash.

20140913_162502Place the charcoal grate on the handles, remove the ash pan and dump it out.

20140913_162559Here is a tip we learned.  Make sure that when you shake the charcoal pan that you do it gently and try to keep things that can light on fire away from the box.

Now, the moment you were waiting for.  Your first peak into the box.

20140913_162631

As you can see, the pig is nicely roasted on this side at this point.  There are areas that look dark on this picture, they weren’t burnt.  They were actually nice and crispy and tasted great.

Time to flip the pig.  Grab the rack at one end and lift.  Let the bottom slide to the opposite side of the box from where it originally was placed then lower the top end back down. This can easily be done with one person.

20140913_162636

As you can see from the picture below, the skin side is seriously missing some colour.

20140913_162650

Take a knife and score the skin in an “X” pattern in each of the rectangles created by the rack.  Be careful to not cut too deeply.  We just want to score the skin, not the meat.

20140913_162729

We decided to try 2 beer can chickens in the box at this point just for fun.  They turned out awesome.

Put the ash pan back on the box and put the charcoal grate back in place.  It should take between 30-45 minutes to crisp the skin.  Check the skin after 30 minutes.  If it is not done to your liking, cook for another 15 minutes.

Here is what our pig looked like.

20140913_171501

Take the pig out of the cooker, remove it from the rack and let rest for about 30 minutes.

You will need a heat resistant pair of gloves for the next part.  Separate the pig and pull the meat from the carcass and serve.  The meat will be so tender you will not need any type of knives or tools for this.  The only thing I used was a cleaver to make cutting up the crispy skin easier.  The skin was awesome.  Glass shatteringly crispy and tasty.

20140913_174040 20140913_174305

Start to finish the pig took 4 hours and 45 minutes. It was relatively easy to do and everyone loved the pig.  I would change absolutely nothing.

Serve with some nice salads, buns to make sandwiches, mustard and sauces and enjoy!

MD

Chicken Breasts

Let’s tackle an easy one.  Boneless, Skinless Chicken Breasts.

Probably one of the most commonly cooked pieces of meat and probably one of the things I get asked about the most.  Truthfully, not my favourite. I’m a thigh man myself.  I guarantee you that one will be coming soon.

As common as chicken is it gets brutalized fairly often.  I know a few people who will not go near white meat because they complain that it’s always too dry.  Here comes the truth…it’s not the chicken’s fault.

White meat can be plenty juicy and very enjoyable with a couple of simple tips.

First, when buying the chicken try to buy pieces that look to be similar sizes.  If you have one huge piece and 2 tiny pieces, you are either going to have 1 undercooked piece or 2 dry pieces if you cook them for the same amount of time.

Second, dry those babies off.  When you pull them out of the package they will probably be wet.  We want our chicken to be dry(ish) when we start to season them.  This will ensure the chicken gets evenly seasoned and you don’t have your seasoning running off.


The seasoning….Now, you can put anything and everything you like on your chicken at this point.  Some things to keep in mind.  If you use any rubs or sauces at this point that have a lot of sugar in them it will probably burn and go black and gross on you before the chicken has a chance to cook.  If you use a rub with a lot of salt, be careful.  It is very easy to make your chicken too salty this way.

Me personally, I use 3 things on my chicken…olive oil, salt and pepper.  That’s it.  Now to be truthful, its not regular table salt I use.  It’s Lawry’s Seasoned Salt.  The salt and pepper are for flavour obviously…but why the oil?  Two reasons.  It will hold the seasoning to that chicken like it’s life depended on it and it will prevent the chicken from sticking to the grill.  I use a very very small amount.  Just a light brushing on both sides before I apply the S&P.

Notice I didn’t go crazy on the seasoning.  Enough that you will know that it’s there but not so much it will overpower the chicken.

Now toss those bad boys on the grill.

 Here’s a little known secret about BBQs…they have more than one setting…That’s right!  Despite common thinking, you do not have to cook everything on High/Max heat.  Shocker, I know.

Notice I have my BBQ at just over Medium heat for the chicken.  Too high and the outside will burn before the middle is cooked.

Here’s another tip.  Shut the lid.  The chicken isn’t going anywhere.  By shutting the lid we create an oven like environment.  This will cook the chicken quicker and more evenly.  The chicken is probably going to take 7-10 minutes a side.  As long as you remembered to put it on medium heat you will be fine.  Now if you want to open the lid and check from time to time no problem.

 Flipping the chicken.  The meat itself will tell you when it is ready to be flipped.  If the chicken is sticking to the grill, shut the lid and check again in a few minutes.  Your chicken only needs to be flipped once.  That’s right, once. Not nine thousand times. Notice on my chicken below nothing stuck and you get nice looking grill marks on the chicken. Also, it’s not too dark.  Thank you Mr. Medium Heat Setting.

 Close the lid again and cook for approximately 7-10 minutes more or until the chicken reaches 165 degrees F internal temperature.  A good meat thermometer will be your best friend and almost mandatory for a lot of things you will cook on a BBQ and definitely in a smoker.  I use a Thermapen.  It was expensive, but worth every penny.

If your chicken is getting too much colour before you reach your desired temperature, move it to the top rack or to a burner that is off and shut the lid.  Let the heat of the burners that are still going turn the BBQ into an oven and finish the cooking that way.

If you wish to use BBQ sauce, now is the time.  Apply the sauce to both sides and let sit on the top rack for 5 minutes to set the sauce.

Now the hard part.  When you take the chicken off let it sit for a good 3-5 minutes before you serve it.  I know this is the hardest thing to do but it is so worth it.  This will allow the juices in the chicken to stay in the chicken.  If you cut it right away you will watch all your hard work literally pour out of the chicken.  We did a lot of work here to keep that chicken juicy, don’t take a shortcut now.

 I don’t know if these pictures capture it properly, but you could literally see how juicy the chicken is at this point.  Also notice it’s cooked all the way through and no pink anywhere in sight.

 Any questions, leave a comment here or get in touch directly and I will help you out.

Enjoy!

MD

Me

Hi, my name is Mike Deman and I am a BBQer.

For the last bunch of years I have been a part of a professional BBQ team (Can’t Stop Grillin’) that travels around North America competing in BBQ contests. Not rib fests mind you, the real deal. Contests where you compete in different categories and submit your offerings to judges in a blind tasting. Awards are then dolled out but it’s more about the bragging rights and the fun and challenge of it all.
The team I have been part of has had some fairly decent success. Highlights for me would be winning multiple grand championships in Canada and the USA, winning an invitation the the Jack Daniels International BBQ Championship in Lynchburg,  cooking for the US Ambassador and a few thousand of his closest friends for a 4th of July party at the US Embassy but most of all….showing my kids that meat comes from animals, veggies are grown in the ground and there’s more than just ketchup that belongs on a burger.

I love to eat. That’s my inspiration for sure. My other inspiration is the people around me.  I think with anyone who enjoys cooking the best part is watching others try your stuff. I love sharing what I cook and feeding as many people as I can something that maybe they have never had before.

With having a wife and 2 young boys I’m a pretty busy guy. But never too busy to throw something in the smoker for a friend or bbq something up and spend some time with family.

MD

Welcome!

Well….

Here is something I never in a million years thought I would do; create a blog.  I mean really, who could possibly be that interested in reading what I have to say or to be honest; how could I possibly think anything I have to say could be that interesting?!

This blog exists as it is now because of one specific reason.  I have been asked multiple times over the last few years for recipes, tips, tricks, advise, etc. on all things food, cooking and bbq.

So, I am going to en-devour to log all things creative, new, interesting and whimsical here on this page for all to see.  If you come here once or come here a million times that will be up to you.

What I hope is that this is a page to share what my friends and family have enjoyed and how I went about creating those items.

With all that said….welcome!

Look around and who knows what you might find!

MD